Printing To Screen
“The most effective debugging tool is still and careful thought, coupled with judiciously placed print statements.” - Brian Kernighan
Printing is an important aspect of an operating system, especially in early development because it is our way to gain a visual output from our operating system. This will massively improve the interaction with our OS, and not only will it give us a huge advantage in debugging, but it will also grant us the ability to display a shell, which we will do in the upcoming chapters.
Why didn’t we print until now?
If you remember the example code in the first bootable code we wrote, we did print to screen during that code.
This print utilized the Video (int 10h) interrupt on BIOS with the Print Char (0xE) function to print character by character the string ‘Hello, World!’
This was our only way to print we were on real mode. And while I developed the code, I actually did use it to print single characters as errors code, So I could understand what was my program doing.
On protected mode, we couldn’t use the BIOS anymore, so printing was much harder. Additionally, we only turned on paging, so debugging with QEMU monitor was much easier.
While we could have written a simple printer for each stage, it was not necessary, and it would have bloated our binary, which in the first stage had only 512 bytes, and had almost no use in the second stage. But now, on the kernel init stage, it would become really handy!
How to print without BIOS?
We are gonna print using the Video Graphics Array or VGA for short. This protocol as the name suggests, puts an array in memory which will represent our screen. When we want to print, we simply write the content to the array, and it will automatically refresh on certain interval display to newly provided content.
The VGA Protocol
VGA has primarily two modes, the first one is called graphic mode, which is used to write raw pixels to the screen. The second mode is called text mode and it is used to write text to the screen. In this chapter we are going to focus on the text mode because we mostly want to provide messages and text on the screen.
Maybe on later chapters we will implement UI, so we will a more graphic mode, but then we actually might not use VGA
Printing with Text Mode
To print with text mode, we need to write to the screen buffer a special character that is 2 bytes long. This special character encodes the actual ASCII character that we are going to print, the background color of the text, and the foreground color of the text.
The screen buffer of the
graphic modestarts at address 0xA0000 and the screen buffer of thetext modestarts at address 0xB8000.
The first byte encodes the ASCII character, and it is not special. The second byte will encode our color, the first 4 bits will be the foreground color, and the next 4 bits will be the background color.
There are multiple color palettes that VGA uses, the one our mode uses, is the 4 bit color palette and it includes the following colors.
#[repr(u8)]
/// All the colors coded per the VGA documentation
pub enum Color {
    Black = 0,
    Blue = 1,
    Green = 2,
    Cyan = 3,
    Red = 4,
    Magenta = 5,
    Brown = 6,
    LightGray = 7,
    DarkGray = 8,
    LightBlue = 9,
    LightGreen = 10,
    LightCyan = 11,
    LightRed = 12,
    Pink = 13,
    Yellow = 14,
    White = 15,
}#[derive(Clone, Copy)]
pub struct ColorCode(u8);
impl ColorCode {
/// Set the VGA char Background and Foreground
///
/// # Parameters
///
/// - `foreground`: The color of the character itself
/// - `background`: The background color of the character
pub const fn new(foreground: Color, background: Color) -> Self {
Self((background as u8) << 4 | (foreground as u8))
}
}
impl const Default for ColorCode {
fn default() -> Self {
ColorCode::new(foreground: Color::White, background: Color::Black)
}
}Then the encoding of each Screen Character will look like this.
#[repr(C)]
#[derive(Clone, Copy)]
pub struct ScreenChar {
    char: u8,
    color_code: ColorCode,
}

impl ScreenChar {
    /// Create a new instance with the given char and
    /// [`ColorCode`]
    pub const fn new(char: u8, color: ColorCode) -> Self {
        Self {
            char,
            color_code: color,
        }
    }
}

impl const Default for ScreenChar {
    /// Create a default Screen char with Space as char
    /// value, and with the default [`ColorCode`]
    fn default() -> Self {
        Self {
            char: b' ',
            color_code: ColorCode::default(),
        }
    }
}
At this point, we are ready to write to the screen whatever we want, we just need to write a ScreenChar to the screen. But, this is not exactly what we want, because it is hard to print strings this way.
Creating a Custom Writer
As always, rust has amazing features, and one of them is built in formatting on the core library.
For those who are unfamiliar with the subject, formatting is turning a variable or a struct into a printable string.
For example, if we have a variable
xwhich holds the number100, how do we know how to print it? because it is not a string, formatting helps us with this ‘type change’.You might be familiar with the
printffunction is C (Print Formatted), Rust offers us thefmt::Displayandfmt::Debugtraits to handle formatting
But what does it mean for us? It means that if we implement our custom writer (which just needs to print regular ASCII strings), we freely get the ability to print variables in the code, and complex structs, since they can be easily derived by the Debug trait.
To create our custom writer we just need to implement the fmt::Writer trait on a custom struct. Our simple writer, will just include place we currently are on the screen, the color the print has, and, and a reference to the screen buffer.
/// Writer implementation for the VGA driver.
pub struct Writer<const W: usize, const H: usize> {
    pub cursor_position: usize,
    pub color: ColorCode,
    pub screen: &'static mut [ScreenChar],
}

impl<const W: usize, const H: usize> const Default for Writer<W, H> {
    fn default() -> Self {
        Self {
            cursor_position: 0,
            color: ColorCode::default(),
            screen: unsafe {
                core::slice::from_raw_parts_mut(
                    data: VGA_BUFFER_PTR as *mut ScreenChar,
                    len: W * H + 1,
                )
            },
        }
    }
}
Then, we need to handle the following functionalities:
-
If a character is in ASCII range, write it to the buffer at cursor position, and advance the cursor.
-
If the
\ncharacter was entered, don’t print anything, but put the cursor at the start of the next line. -
If
BackspaceorDeletecharacter were entered, move the cursor back one position, and fill that position with the default character. -
If we are at the end of the screen, we need to scroll down a line, which means to copy the entire buffer one line to the left1.
- Function to clear the screen entirely
Now that we have all the functionality in mind, we can go right into the implementation!
impl<const W: usize, const H: usize> Writer<W, H> {
    /// Writes the given `char` to the screen with the color
    /// stored in self
    ///
    /// # Parameters
    ///
    /// - `char`: The char that will be printed to the screen
    fn write_char(&mut self, char: u8) {
        // ANCHOR: handle_char
        let c: AsciiChar =
            Char::from_u8(char).expect("Entered invalid ascii character");
        match c {
            Char::LineFeed => {
                self.new_line();
            }
            Char::Backspace | Char::Delete => {
                self.backspace();
            }
            _ => {
                if !c.is_control() {
                    self.screen[self.cursor_position] =
                        ScreenChar::new(char, self.color);
                    self.cursor_position += 1;
                }
            }
        }
        if self.cursor_position > W * H {
            self.scroll_down(lines: 1);
        }
        // ANCHOR_END: handle_char

        // ANCHOR: change_position
        self.change_cursor_position_on_screen();
        // ANCHOR_END: change_position
    } fn write_char
    /// Scroll `lines` down.
    fn scroll_down(&mut self, lines: usize) {
        let lines_index: usize = W * (H - lines) + 1;

        // Copy the buffer to the left
        self.screen.copy_within(src: lines * W.., dest: 0);

        // Fill remaining place with empty characters
        for x: &mut ScreenChar in &mut self.screen[lines_index..] {
            *x = ScreenChar::default()
        }

        self.cursor_position -= lines * W;
    }
    fn new_line(&mut self) {
        self.cursor_position += W - (self.cursor_position % W)
    }
    fn backspace(&mut self) {
        self.cursor_position -= 1;
        self.screen[self.cursor_position] = ScreenChar::default();
    }
    /// Clears the screen by setting all of the buffer bytes
    /// to zero
    fn clear(&mut self) {
        self.screen.fill(ScreenChar::default());
        self.cursor_position = 0;
    }
} impl Writer<W, H>
For now, the
change_cursor_position_on_screenfunction is not relevant, and it uses I/O instruction to change the cursor position. This will be covered in future chapters.
With this, we are ready to implement the fmt::Writer trait on our struct. Because it only requires us to implement the write_str function, which is easy to implement because we have our write_char function.
impl<const W: usize, const H: usize> core::fmt::Write for Writer<W, H> {
    /// Print the given string to the string with the color
    /// in self
    ///
    /// # Parameters
    ///
    /// - `str`: The string that will be printed to the screen with the
    ///   color in self
    ///
    /// # Safety
    /// THIS FUNCTION IS NOT THREAD SAFE AND NOT MARKED
    /// UNSAFE BECAUSE OF TRAIT IMPLEMENTATION!
    /// THE FUNCTION WILL ADD LOCK AND WILL BE SAFE IN THE
    /// FUTURE
    ///
    /// TODO: use lock in the future
    fn write_str(&mut self, str: &str) -> core::fmt::Result {
        for char: u8 in str.bytes() {
            self.write_char(char);
        }
        Ok(())
    }
} impl Write for Writer<W, H>
The only thing that is missing is to initialize the writer, and write a function that will also print with a custom color, this function is relatively straight forward, and it will just change the color, print the message, and restore the color back to default.
static mut WRITER: LateInit<Writer<W:80, H: 25>> =
    LateInit::new(val: Writer::default());

pub fn vga_print(args: fmt::Arguments<'a:'_>, color: Option<ColorCode>) {
    unsafe {
        if let Some(c: ColorCode) = color {
            WRITER.color = c;
        }

        WRITER.write_fmt(args).unwrap();

        WRITER.color = ColorCode::default();
    }
}
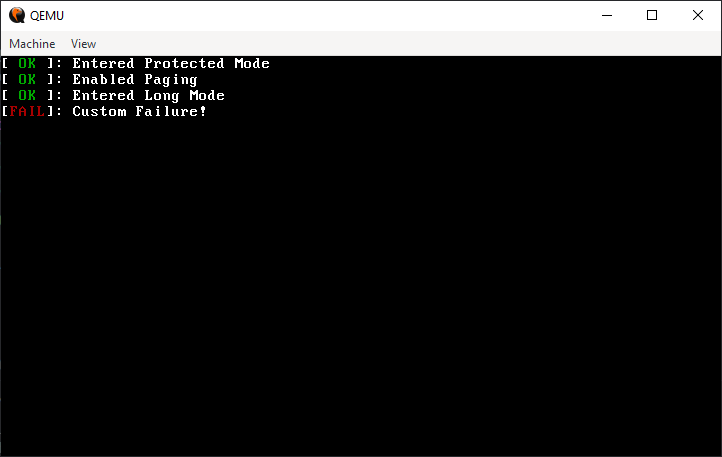
An example usage, could be an OK message of what we already initialized!
#[unsafe(no_mangle)]
#[unsafe(link_section = ".start")]
#[allow(clippy::missing_safety_doc)]
pub unsafe extern "C" fn _start() -> ! {
    okprintln!("Entered Protected Mode");
    okprintln!("Enabled Paging");
    okprintln!("Entered Long Mode");
    eprintln!("Custom Failure!");
}
Exercise
-
The standard library has a
print!andprintln!macros, we are really close for one, implement it! -
Implement the
okprintln!andeprintln!that we used above.
Answers can be found at here
-
Our buffer represents a 2D grid of
ScreenCharelements, but it is actually just one big 1D buffer. So copying the entire buffer one line up is equivalent to shifting all the characters one line to the left. ↩